
0. Interceptor란?
인터셉터(Interceptor)는 intercept(가로채다) 라는 뜻에서 알 수 있듯, 컨트롤러로 들어오는 요청(Request)과 응답(Response)을 가로채는 역할을 한다.
어떻게보면 필터(Filter)와 같은 역할을 하는 것 같지만 요청, 응답을 가로채는 위치와 설정 방법이 다르다.
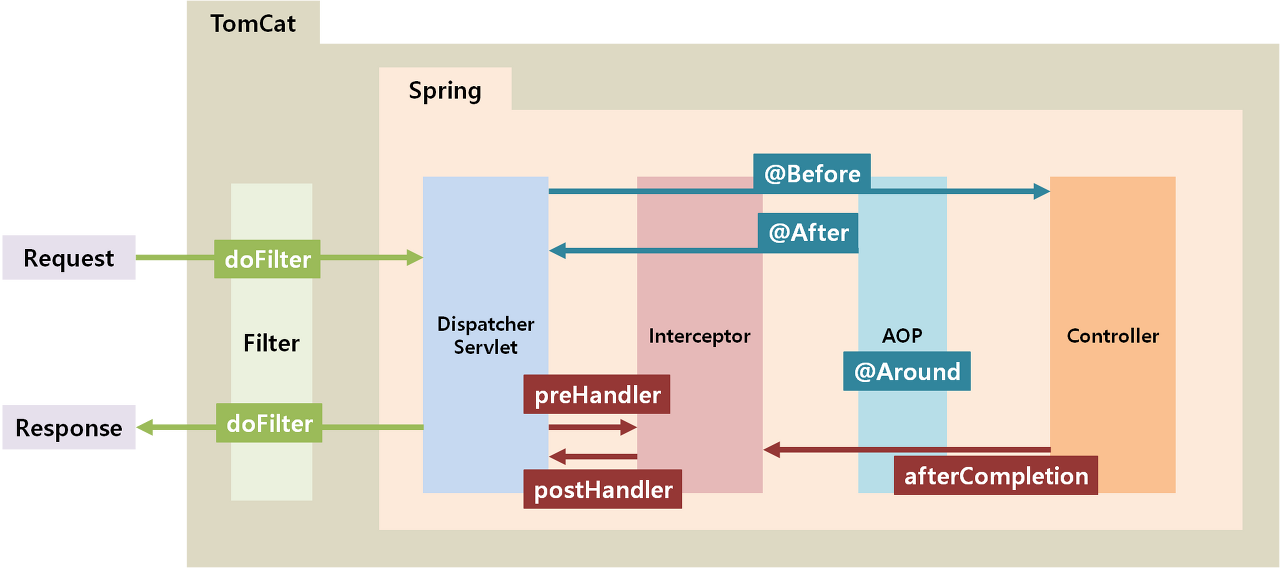
필터의 경우 Spring의 영역이 아닌 Tomcat, 즉 WAS의 영역에서 요청와 응답을 인터셉터나 AOP보다도 가장 먼저 맞이한다. 인터셉터의 경우 Dispatcher Servlet와 Controller 사이에서 요청과 응답을 가로챈다.
필터는 Filter 인터페이스를 구현하여 처리해야하는 작업을 정의할 수 있다. 인터셉터의 경우 HandlerInterceptor 등을 통해 기능을 구현한 자바 클래스를 만들어야한다.
1. HandlerInterceptor 구현 클래스 생성
HandlerInterceptor 인터페이스를 구현하여 특정 URI에 대한 요청이 컨트롤러로 접근하기 전에 사용자가 로그인 중인지 확인하는 인터셉터를 만들어보았다.
HttpServletRequest를 통해 세션에 'memInfo'라는 이름으로 저장된 회원 정보 객체를 꺼내온다. 만약 로그인하지 않았다면 해당 객체는 세션에 존재하지 않기 때문에 null 값을 반환한다.
만약 세션에서 가져온 회원 정보가 null 이라면 HttpServletResponse를 통해 짧은 HTML 구문을 전송한다. 메서드는 false를 반환하므로 요청은 더 이상 다음 단계(또 다른 인터셉터나 핸들러 등)로 진행하지 못 한다.
세션에 회원 정보가 저장되어 있는 경우 로그인했다는 의미이므로 true를 반환한다. true를 반환하면 요청은 다음 단계로 진행할 수 있다.
package kr.or.ddit.interceptor;

import javax.servlet.http.HttpServletRequest;
import javax.servlet.http.HttpServletResponse;

import org.springframework.context.annotation.Configuration;
import org.springframework.web.servlet.HandlerInterceptor;

import kr.or.ddit.vo.MemberVO;

@Configuration
public class LoginInterceptor implements HandlerInterceptor {

    @Override
    public boolean preHandle(HttpServletRequest request, HttpServletResponse response, Object handler)
            throws Exception {

        MemberVO memInfo = (MemberVO) request.getSession().getAttribute("memInfo");

        if(memInfo == null) {
            response.setContentType("text/html;charset=utf-8");
            response.getWriter().print("<script> alert('로그인이 필요합니다.');"
                                     + "location.href='/member/login'; </script>");
            return false;
        }

        return true;
    }
}
* HandlerInterceptor 메서드
| public boolean preHandle(HttpServletRequest request, HttpServletResponse response, Object handler) | 컨트롤러로 들어오는 요청을 가로채는 메서드 |
| public void postHandle(HttpServletRequest request, HttpServletResponse response, Object handler, ModelAndView modelAndView) |
컨트롤러에서 나오는 요청을 가로채는 메서드 |
| public void afterCompletion(HttpServletRequest request, HttpServletResponse response, Object handler, Exception ex) | View의 랜더링을 마친 뒤의 요청을 가로채는 메서드 |
2. servlet-context.xml에 인터셉터 등록하기
클래스 작성을 끝낸 후에는 servlet-context.xml에 인터셉터를 등록해야한다. servlet-context.xml에서는 사용할 인터셉터 구현 클래스를 설정하고 인터셉터를 사용할 URI를 지정할 수 있다.
<?xml version="1.0" encoding="UTF-8"?>
<beans:beans xmlns="http://www.springframework.org/schema/mvc"
	xmlns:xsi="http://www.w3.org/2001/XMLSchema-instance"
	xmlns:beans="http://www.springframework.org/schema/beans"
	xmlns:context="http://www.springframework.org/schema/context"
	xsi:schemaLocation="http://www.springframework.org/schema/mvc
                        https://www.springframework.org/schema/mvc/spring-mvc.xsd
                        http://www.springframework.org/schema/beans
                        https://www.springframework.org/schema/beans/spring-beans.xsd
                        http://www.springframework.org/schema/context
                        https://www.springframework.org/schema/context/spring-context.xsd">

    <beans:bean id="loginInterceptor" class="kr.or.ddit.interceptor.LoginInterceptor" />
    <interceptors>
        <interceptor>
            <mapping path="/member/withdrawal" />
            <mapping path="/member/update" />
            <mapping path="/member/logout" />
            <beans:ref bean="loginInterceptor" />
        </interceptor>
    </interceptors>

</beans:beans>
* 인터셉터 설정
| <beans:bean> | 인터셉터 구현 클래스 설정 (빈 생성) |
| <interceptors> | 인터셉터의 설정 목록 |
| <interceptor> | 개별 인터셉터 |
| <mapping> | 인터셉터를 사용할 URI |
| <beans:ref> | 사용할 인터셉터 빈의 id |
'Java > Spring Framework' 카테고리의 다른 글
| [Spring Framework] @GetMapping과 @PostMapping (0) | 2023.01.26 |
|---|---|
| [Spring Framework] 파일 업로드 (0) | 2023.01.23 |
| [Spring Framework] Spring Legacy Project의 xml 파일들 (0) | 2023.01.20 |
| [Spring Framework] 핵심 개념 (0) | 2023.01.20 |
| [Spring Framework] MyBatis 연동하기 (0) | 2023.01.19 |